Orchard Firmware Developer's Guide
Setting up your Environment
For the sake of convenience, Orchard firmware development, including compilation, flashing, and manufacturing provisioning is all done with a single tool: A Raspberry Pi.
Recommended tools:
- Raspberry Pi 2 Model B with 8 GB microSD card
- Firmware image: Raspberry pi Orchard development SD disk image
- A Linux machine to write the initial firmware image out
- Jumper cables, 5-wire (for SWD) and 2-wire (for UART), going between male 0.1" headers.
Hardware Setup
1. Download the RPi firmware image (~2GiB).
2. Image the downloaded firmware onto an SD card using the following Linux command: (This may take about 10 minutes)
zcat orchard-pi-dev.img.gz | sudo dd of=/dev/sdX bs=1M # for SD cards mounted via USB adapters
or
zcat orchard-pi-dev.img.gz | sudo dd of=/dev/mmcblkX bs=1M # for machines with directly accessible SD cards
Note that /dev/sdX is the device node of the SD card as mounted on your Linux system. If you don't know what we're talking about, be careful, because if you pick the wrong /dev/sdX node you'll end up destroying your local system boot disk.
3. Insert card into RPi and boot.
4. Figure out the IP address of the RPi and ssh into it. This is probably the hardest step.
- Here's a guide to figuring out your IP address
- One method is to access the local router configuration page and query the DHCP client list and look for the rasperrypi client. This works if you're in a home environment where you have access to the local DHCP server
- If you don't have access to that, you can plug in an HDMI monitor and keyboard and find the IP address using ifconfig
- A final method is to use nmap to scan for the IP address
- Another solution is to use zeroconf. The image provided runs zeroconf and if your local system supports that. Linux users should install avahi-dnsconfd. Windows users will need to install bonjour printing services. If you have zeroconf, you should be able to run
ssh pi@raspberrypi.local
And the system will automatically find it (assuming it's the only Pi on the network, additional Pi's get a hyphenated numeral after the raspberrypi name)
Either way, the credentials are "pi" and "raspberry" for the username and password.
5. Wire up your raspberry pi to the orchard dev board.
Be careful to not use the two pins closest to the outside corner of the board. They have 5V on them and will damage orchard if you wire it up to its signal pins.
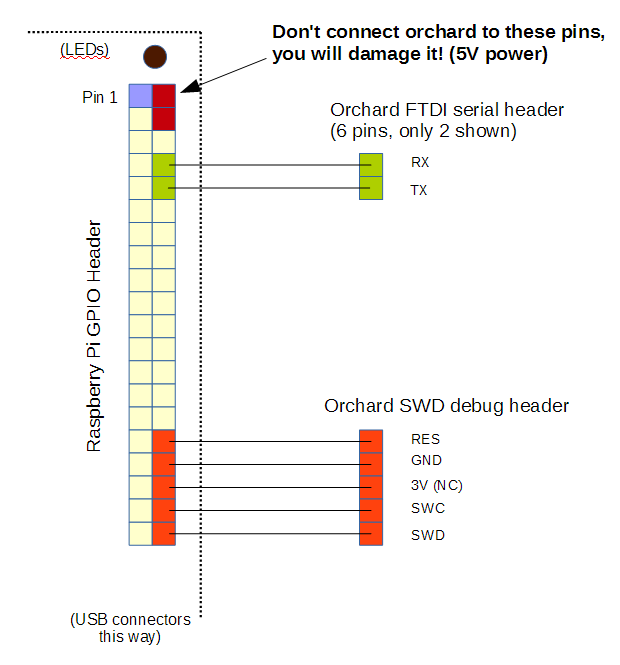
If you're unsure, here's some photos of the orchard-raspberry pi connection.
6. Plug power into the orchard dev board via the microUSB cable.
Firmware Development
Build your firmware image
1. Update your source code
cd orchard-src
git pull
2. Build an image
cd ~/orchard-src/orchard
make -j4
Note: If you're using an alternate keyboard or board version from the default Makefile (currently BC1/EVT1B), specify the version as follows in the environment variable:
make -j4 KEY_LAYOUT=BM BOARD_REV=EVT1
Connect OpenOCD
To get openocd support, check out openocd, configure it with --enable-sysfsgpio, and build it:
   git clone git://git.code.sf.net/p/openocd/code openocd-code
   cd openocd-code
   ./bootstrap
   ./configure --enable-sysfsgpio
   make
   sudo make install
Start openocd, the connection between the Rpi host and the Orchard target CPU:
sudo openocd -f sysfsgpio-rpi.cfg &
If you've wired up the boards correctly, you should see this somewhere in the log:
Info : SWD IDCODE 0x0bc11477
The correct IDCODE means we can see the CPU over the SWD debug port.
First-time Provisioning
New C program method After you type make, you can use this command line to provision any board, regardless of its state, and you don't need to start openocd separately:
./build/factory-test -v \
    --swclk 20 --swdio 21 \
    --elf /home/pi/orchard-src/orchard/build/orchard.elf \
    --no-tests
If you can just memorize that, it's really convenient. I'd suggest making a script in your branch so you don't have to memorize it.
Old python method You will need to switch to branch factory-r1 before provisioning.
git pull github factory-r1
## you may have to set your username and email for github, follow the directions that appear
git checkout factory-r1
If you don't do the above and you just do a pull, you'll find that the flash-firmware-openocd-rpi.cfg and flash-firmware.py modules have disappeared.
On a blank device (factory new or mass-erased), you will need to provision an initial firmware image.
The Kinetis W repeatedly stabs itself in the eye when the Flash is empty, and will not work with GDB until it has something valid to run. The current procedure involves opening two SSH sessions to the Rpi. In the first one, type:
sudo openocd -f flash-firmware-openocd-rpi.cfg
In the second one, run
./flash-firmware.py
This will provision an initial image onto the Orchard board. Once you've run this, you don't need to run it again.
Quit OpenOCD after provisioning by hitting "Control C".
GDB Debugging
Once the initial image is provisioned, you can connect via gdb.
The current procedure involves opening two SSH sessions to the Rpi. In the first one, type:
sudo openocd -f sysfsgpio-rpi.cfg
In the second window, run GDB:
gdb -ex "target remote localhost:3333" build/orchard.elf
From this point, you can use all your usual gdb commands: breakpoints, running, source code listing, disassembly, variable inspection, single-stepping, etc. etc. For a list of common gdb commands, see Orchard gdb cheatsheet
If when you try to connect via GDB, you see this message:
(gdb) target remote localhost:3333
Remote debugging using localhost:3333
Info : accepting 'gdb' connection on tcp/3333
Warn : Cannot communicate... target not halted.
Error: auto_probe failed
You need to halt the CPU manually. You can do this by doing
telnet localhost 4444
reset halt
exit
And then running the gdb command again.
Loading your own code
Once you've developed your code, putting new firmware on the board is done through gdb. Inside gdb, just type
load
And that will automatically grab the firmware at build/orchard.elf and load it into the system.
You can then type
c
to run the program or you can also use
mon reset halt
to reset the board to a halted state. You can then modify breakpoints or continue execution.
Serial Console
To talk to the serial console, open another window (perhaps via a second ssh session) and type this command:
sudo screen /dev/ttyAMA0 115200
You should see a "ch>" prompt if you hit enter.
To exit the screen session, type cntrl-A \ y
First time runners Need to set the charge capacity of their battery by typing
chgcap 1150
That sets the design capacity to 1150mAh, which allows the gas gauge to more accurately report the remaining battery life.
Code Documentation
Overview
Orchard runs ChibiOS 3, a lightweight multi-threaded RTOS.
For those who have not done multi-threaded programming, the key thing to pay attention to are the locks on resources, to prevent contention that can lead to hardware lock-ups and hanging. As you write code, think to yourself, "if someone else interrupted me in the middle of this, would that be bad?" If the answer is yes, you should consider using a lock on a resource.
The base firmware as of June 2015 runs the following threads:
- main
- idle
- charger watchdog
- LED effects
- shell
- orchard app
3792 bytes of heap are free, out of 16k total RAM, and 80k of ROM is used (this includes -f debug-all-the-things).
Soft-float vs. hard-float
This note is specific to Novena and native builds when not cross-compiling. There are two ABIs, armhf and armsf. ChibiOS needs to be configured to use the correct one. As a result we have to link with the proper libraries. See the orchard/lib directory and Makefile for more details.
Threads
The main thread is the first thread run by chibiOS. Eventually, this thread is responsible for managing and launching the apps. It has a 768 byte stack area.
The charger watchdog is responsible for pinging the BQ24260 charger when in boost or charger mode. The charger will turn off charging or boosting if it thinks the MCU has crashed, as a matter of safety. The thread is always running, and the behavior to ping the the charger is configured via a static variable called the "chargerIntent". The idea being that another thread will communicate the intent of the system to the thread, and the next time it's scheduled to run the charger thread will actually implement that intent. This thread has a 192 byte stack area.
The LED effects thread is responsible for rendering the WS2812B frame buffer (16 pixels total on the burning man edition), compositing with the UI cues, and running the bit-bang protocol to send data to the LEDs. The bit-bang protocol is a hand-coded assembly routine (see ws281b_ll.s), tuned via clock counting to create the correct waveforms. Since it's timing sensitive, the actual LED update locks the entire system for the duration of the update. The LED thread also has a one-way mode to turn off the LEDs for system shutdown (if you don't render all off-state to the LEDs, they'll stay on). This thread has a 256 byte stack area.
The shell thread launches shell commands. These are commands entered via the serial debug port. Shell commands are typically used for debugging and configuration. More on this later. The shell thread has a 768 byte stack.
The orchard app thread launches UI apps. These are applets that use the OLED and typically respond to touch surface events for interaction. Apps are the actual user-visible front ends to orchard functionality. The app thread has a 2048 byte stack.
The idle thread runs when nothing else is scheduled to be run. See chibiOS thread documentation.
Conventions
- Functions that are globally visible have names in camelCase.
- Functions that are static to a file use_underscores_between_words.
- All low level drivers have a Start and Stop function (e.g., accelStart(), accelStop()). Calling Stop puts it into a low-power state, calling Start brings it back to life.
- Some drivers also have an Init call, that should get called exactly once.
- Use two spaces for indentation. No tabs.
- Use /* and */ for comments.
Gotchas
Be aware when you're executing in an interrupt context. Typically callbacks and handlers run in an interrupt context. This includes:
- Timer callbacks
- interrupt handlers
- ADC callbacks
When you're in an interrupt context, you can't run operations that can potentially cause another interrupt to happen, which turns out to be most interesting things. You can only run system functions that have an I or S in their name (e.g. chEvtBroadcastI() or chVTSetI()).
Typically to get around this, handlers issue events which are queued into a thread, and handled in a normal, interruptable context.
Eventing system example
One fun feature of ChibiOS is a many-to-many event system. Events are represented by an object of type event_source_t. Objects must be initialized once using chEvtObjectInit().
Events can then be hooked and unhooked using the call evtTableHook() and evtTableUnhook(). You can assign multiple hooks to a single event, thus allowing one event to drive behaviors in multiple threads.
An event is broadcast to the system using chEvtBroadCast(), or alternatively, chEvtBroadCastI() when you're running in an interrupt context. chEvtBroadCastI must be flanked by chSysLockFromISR() and chSysUnlockFromISR() on either side.
An example of a fairly complex event system is the USB charge detection loop. The purpose of this loop is to periodically measure the D+/D- pins on the USB interface to see if we've been plugged into a charger.
Most of the code is in orchard-app.c. It starts with a timer, chargecheck_timer, that runs a callback run_chargecheck:
chVTReset(&chargecheck_timer);
chVTSet(&chargecheck_timer, MS2ST(CHARGECHECK_INTERVAL), run_chargecheck, NULL);
run_chargecheck itself is in an interrupt context, so it can't directly query the ADC -- the ADC is interrupt-driven. So all it can do is issue an event, and then reschedule itself to run again:
static void run_chargecheck(void *arg) {
  (void)arg;

  chSysLockFromISR();
  chEvtBroadcastI(&chargecheck_timeout);
  chVTSetI(&chargecheck_timer, MS2ST(CHARGECHECK_INTERVAL), run_chargecheck, NULL);
  chSysUnlockFromISR();
}
chargechcek_timeout is an event that's setup as follows:
 chEvtObjectInit(&chargecheck_timeout);
 evtTableHook(orchard_events, chargecheck_timeout, handle_chargecheck_timeout);
The code for the event handler is simple, it just kicks off a call to update the USB status:
static void handle_chargecheck_timeout(eventid_t id) {
  (void)id;

  // this kicks off an asynchronous ADC request that results in a usbdet_rdy event
  analogUpdateUsbStatus();
}
Inside analog.c, we see how an ADC call is made:
void analogUpdateUsbStatus(void) {
  adcAcquireBus(&ADCD1);
  adcConvert(&ADCD1, &adcgrpusb, usb_samples, ADC_GRPUSB_BUF_DEPTH);
  adcReleaseBus(&ADCD1);
}
Note how adcConvert is flanked by an Acquire/Release motif. Most shared hardware resources, such as SPI and I2C, will require you to lock a mutex, so that multiple threads don't bash each other during a hardware operation. Failing to acquire/release mutexes like this is one of the most common causes of unreliability in chibiOS -- so do it!
adcConvert in this case has a callback of adc_usb_end_cb given to it, which was plugged into the correct spot in the ADCConverionGroup structure (adcgrpusb).
adc_usb_end_cb is handed a sample buffer and it computes the USB status and stores it in a static variable for another thread to later retrieve, and then issues a usbdet_rdy event. Again, this routine has to be minimal because it's running in an interrupt context and we use the event system to signal to a regular thread that it should read the usb_status variable:
static void adc_usb_end_cb(ADCDriver *adcp, adcsample_t *buffer, size_t n) {
 (void)adcp;
 (void)n;

 usbn = (uint16_t) buffer[0];
 usbp = (uint16_t) buffer[1];

 // plugged into "live" USB port: USBN > 0xE000 && < 0xF800, USBP < 0x200
 // not connected: UNBN > 0xFF00, USBP > 0x200 (primarily USBN is the determining factor)
 // plugged into "CDP" port: USBN ~ USBP ~ FD00

 usb_status = usbStatNC;
 if( (usbn > 0xE000) && (usbn < 0xF800) && (usbp < 0x400) ) {
   usb_status = usbStat500;
 } else if( (usbn > 0xF000) && (usbp > 0xF000) ) {
   usb_status = usbStat1500;
 } else if( (usbn > 0xFE80) ) {
   usb_status = usbStatNC;
 }

 chSysLockFromISR();
 chEvtBroadcastI(&usbdet_rdy);
 chSysUnlockFromISR();
}
Back in orchard-app.c, we look and see what's going on with the usbdet_rdy event system:
 chEvtObjectInit(&usbdet_rdy); // this line is actually in orchard-events.c

 evtTableHook(orchard_events, usbdet_rdy, handle_charge_state);
 evtTableHook(orchard_app_events, usbdet_rdy, adc_usb_event);
Here, we see that the usbdet_rdy event actually broadcasts to two handlers: handle_charge_state, and adc_usb_event. handle_charge_state is part of the orchard_events group, and is routed to the main thread. adc_usb_event is routed to the application-specific event handler, giving applications an opportunity to react to the charge state (this is necessary for the charger status app, for example).
handle_charge_state reads the cached USB status (previously computed in an interrupt context) using an API call, and then dispatches to the correct intent behavior that's eventually swept up by the charger thread that manages the charging watchdog. The code is too big to include here but you can find it in orchard-app.c.
adc_usb_event is pretty compact. It just issues an event into the running instance app informing it of the updated USB detection code:
static void adc_usb_event(eventid_t id) {
 (void) id;
 OrchardAppEvent evt;

 evt.type = adcEvent;
 evt.adc.code = adcCodeUsbdet;
 instance.app->event(instance.context, &evt);
}
The app itself would then have a main event loop that would check to see the type of event it received and update the UI accordingly. An example of this is in app-charging.c, inside charging_event().
Command line programs
A serial protocol-driven command line is provided in Orchard. A simple example of a command line program is cmd-mem.c. The entire program can be shown here:
void cmd_mem(BaseSequentialStream *chp, int argc, char *argv[])
{
 size_t n, size;

 (void)argv;
 if (argc > 0) {
   chprintf(chp, "Usage: mem\r\n");
   return;
 }
 n = chHeapStatus(NULL, &size);
 chprintf(chp, "core free memory : %u bytes\r\n", chCoreGetStatusX());
 chprintf(chp, "heap fragments   : %u\r\n", n);
 chprintf(chp, "heap free total  : %u bytes\r\n", size);
}

orchard_command("mem", cmd_mem);
A command is passed a stream (for printf IO -- you can print to any of multiple serial ports, so a stream is passed similar to fprintf()), and an argc/argv pair. Unlike C argc/argv, the command itself isn't passed as one of the pairs, so the 0-index is the first argument, not the name of the command.
Adding a new command is easy. The build system is filename-driven, so:
- Create a file called cmd-yourcommand.c. The cmd-* prefix is a wildcard that informs the Makefile to automatically include this source file in the build.
- Inside the file, include the macro orchard_command("command_name", command_callback).
- A single file can have multiple orchard_command() macros, and it will create commands for each of them. So you don't need one file per command, it's one file per command subsystem.
- cmd-touch.c is an example of multiple command callbacks in a single file.
Applications
Applications are user-facing programs that run in their own thread. They will typically draw to the screen and respond to events generated from low level drivers.
You can only have one application running at a time, and they run in a single thread. ChibiOS threads are cooperative: you can't kill a thread. You can only request its termination. Therefore, apps are wrapped in code that does the following:
- Hooks events into an event handler that ultimately drives app behavior
- Cleans up any UI primitives left dangling by the app
- Listens for the thread termination request and sets up the next app to run upon termination
You don't see any of this code; an app simply implements a unique set of _init, _start, _event, and _exit routines.
Adding an app is similar to creating a new command. The build system is filename-driven, so:
- Create a flie called app-yourapp.c. The app-* prefix tips off the Makefile to include your app for building.
- Include the macro orchard_app("name", app_init, app_start, app_event, app_exit);
- The name is the display name of the app, used by the app launcher
- The app launcher is itself an app, with the exception that its position on the app-list is hard coded as the first app (it doesn't use the orchard_app() macro)
- _init is used to determine how much privileged memory an app needs prior to calling _start. In most cases, it can be left NULL or a dummy.
- _start initializes the app and sets up the UI
- _event handles events and drives the UI in response to events
- _exit cleans up the app
- While you can have multiple apps in a single file, apps are heavyweight enough it's discouraged.
- By convention, a function called redraw_ui() is used to update the graphical UI.
Graphics and UI Primitives
Graphics
Any app is free to grab the frame buffer and just start drawing into it. Because multiple threads can contend for UI resources, any UI operation must be flanked by mutex operations orchardGfxStart() and orchardGfxEnd().
Graphics calls are from the gdisp set of calls in the uGfx library. A subset of the available functions are provided, to keep the memory footprint small. In particular, we have most of the gdisp series of functions, but we don't use their windowing system or eventing system.
Generally, a UI redraw should first blank the screen, and then draw its primitives. Primitives are not flushed to the display until gdispFlush() is called. In other words, you can do all the drawing you want and nothing will appear on the screen until gdispFlush() happens.
Drawing itself is a fairly inexpensive operation, the gdispFlush() call tends to be the most expensive bit, so first complete all your UI drawing before calling the flush.
Remember, you're trying to do UI in just a couple thousand bytes of RAM and a few hundred bytes of code, so when making your wireframes and workflow, keep the resource restrictions in mind. You are not coding for an Android or iOS device!
In theory, it's possible to display bitmaps on Orchard, but it's unclear if there's enough RAM to run the decoder.
UI primitives
Because Orchard is very lightweight and runs on a very small stack, we can't afford to have a windowing system. In order to re-use UI between apps, UI primitives are patched in over an app's event system when they are needed.
Generally, the UI primitives envisioned to be used on Orchard are simple: text entry, selection lists, check boxes, radio boxes, and dialog boxes.
UI state is kept in a UiContext, which has an item list, a linked list of items to render on a UI. It's important that a UI implementation de-allocates any heap structures it creates while running. A single 32-bit value is provided as the ui_result, and the meaning of this value is dependent upon the UI primitive implementation.
When a UI primitive is created, it's hooked into the orchard_app_instance context. Once the pointers no the OrchardUi are non-null, the app event system will redirect all events to the UI, allowing it to draw items on the screen and capture user input. Upon exit, the ui_result is returned, memory is de-allocated, and the UI unlinks itself from the orchard_app_instance state.
An example of how to use a UI primitive is found in app-name.c
Test and Audit Logs
Orchard contains a mechanism for logging tests that have been run on the system. Tests are registered in the system using the macro
orchard_test("testname", test_function)
By convention, tests are located at the bottom of .c files for hardware devices.
Tests
Tests are aggregated into a list of test functions that can be run automatically, or can be run by name. A test takes a single argument that represents the test type, and returns a result code.
Test types are currently:
typedef enum _OrchardTestType {
 orchardTestPoweron = 0,      // test run at power-on to confirm the block is good
 orchardTestTrivial,          // test if we can simply talk to a hardware block
 orchardTestComprehensive,    // a deeper test, as required
 orchardTestInteractive,      // tests that require interaction with factory labor
} OrchardTestType;
- A Poweron test is meant to be run every time at boot. Typically, this would do not much, and is provided solely for cases where this facility might be needed in the future.
- A Trivial test simply checks that we can talk to a hardware block, and verifies parametrics that don't require user interaction, test sources, or extra time. This is your basic "is it soldered correctly" test and should exist for every block.
- A Comprehensive test is a deeper, more extensive test, to be written as required per block. This test can get as crazy as you want.
- An Interactive test may be the same as the Comprehensive test, or it could be a subset of it. Interactive tests are broken out separately as they will require an operator to respond to prompts or require a test data source. These tests only have meaning when paired with a human operator and the proper instructions.
An example of the four types would be the following for the accelerometer:
- Poweron probably would do nothing, or be the same as the Trivial test
- Trivial test would read the device ID out and confirm it's correct
- A Comprehensive test would require an operator to tilt the accelerometer in all 3 axes, as well as shake the device to confrim the interrupt line is working. It may also attempt to check noise limits on the data coming back. It's really not necessary to test this deeply unless we're seeing yield issues in the field due to accelerometer problems.
- An Interactive test would probably be a simple tilt-a-ball graphic where a ball has to roll into four corners on a screen for the test to pass. This confirms basic functionality without having to do too much.
And test results are:
typedef enum _OrchardTestResult {
 orchardResultPass = 0,
 orchardResultFail,
 orchardResultUnsure,
 orchardResultNoTest,  // for cases where there is no test for a function
} OrchardTestResult;
Currently, tests are invoked from the command line, and the functions need to have parallel adaptations to work with gdb callbacks.
Audit Log
The audit log is provided because sometimes you get a unit returned and you see hints of problems, but you're not sure why. Often times these are units that had problems in the factory, and had to be tested multiple times and reworked before it could be given a clean bill of health to ship to a user.
For example, if the was a problem with BLE transmit power, a factory might run the BLE test dozens of times until they see it pass just once, and then declare the unit shippable. A test audit log would allow you to uncover this practice and take corrective action.
The test audit log is also useful for making sure untested units don't ship. The function auditCheck() can be coupled with the orchardGfxEnd() routine to force a message onto the OLED indicating a unit has failed audit. Units that aren't tested but accidentally binned into the tested pile can be found out extremely easily by just turning the unit on and off again.