Novena Cloud Image
Contents
About
Aptira has generously donated the manpower to install a private cloud on the bunniefoo.com cluster. This is an OpenStack based private cloud running on bunniefoo.com's private hardware (the computers sit on the floor next to the bathroom). We decided to create a private cloud, because EC2 is too expensive and too slow to use as a build server. Running on our own hardware makes a single compute unit equal to that of a fast, modern CPU as opposed to a slow EC2 compute unit; and for some reason disk access seems much faster as well. Builds on the private cloud complete in half the time it takes on an xlarge EC2 instance. Regardless, the Aptira private cloud images can be migrated to EC2 in case of over-capacity or privacy/ownership concerns, and key image snapshots are migrated on a regular basis into an amazon snapshot just for safe-keeping/backup purposes.
The goal of the private cloud is to enable core developers to develop EC2-compatible images for various build configurations, that can then be shared as AMIs to other users. By making the images easily cloneable and uploaded into EC2, users who want to duplicate efforts can skip hours of waiting for git fetches and builds to complete, and jump right into development and/or deployment.
The pre-built cloud image comes with the following downloaded, configured, and built:
- OE directory with packages and image ready-to-go
- local toolchain built and installed
- u-boot image configured and built
- kernel image configured and built (note: config & devtree items are symlinked to git repo, beware!):
- inside ~/linux-next/:
lrwxrwxrwx 1 ubuntu ubuntu 79 Feb 17 09:52 .config -> /home/ubuntu/oe/sources/meta-kosagi/recipes-kernel/linux/linux-novena/defconfig
- inside ~/linux-next/arch/arm/boot/dts:
lrwxrwxrwx 1 ubuntu ubuntu    80 Feb 17 09:54 imx6q.dtsi -> /home/ubuntu/oe/sources/meta-kosagi/recipes-kernel/linux/linux-novena/imx6q.dtsi
lrwxrwxrwx 1 ubuntu ubuntu    80 Feb 17 09:54 novena.dts -> /home/ubuntu/oe/sources/meta-kosagi/recipes-kernel/linux/linux-novena/novena.dts
- when building the kernel, don't forget to specify uImage and LOADADDR (see notes on building)
Accessing the cloud image
Access to the cloud image is granted by emailing bunnie. He will create for you a username and password. You will need two of them, one for VPN access (to get to your machine via ssh), and one for the cloud management interface.
If you don't want to deal with managing a cloud instance, bunnie can also start an instance for you and load it with your ssh public key. In which case, the only thing you need to give him is a username/password combo for a VPN. The VPN is implemented using PPTP on DD-WRT. Yes, it's insecure, but the router currently installed can't run OpenVPN. Perhaps future equipment upgrades will change this, but for now the only login method allowed to internal machines in the VPN is ssh with no passwords (pubkey-only).
Currently, only beta testers for the novena dev program are given access to the private cloud. You know who you are :)
Getting started with the Aptira private cloud
Below is a step-by-step tutorial on how to use the cloud interface to start an instance.
Initial console
Log in at https://bunniefoo.com:8443/horizon/auth/login/
When you log in, you will be greeted by the following console.
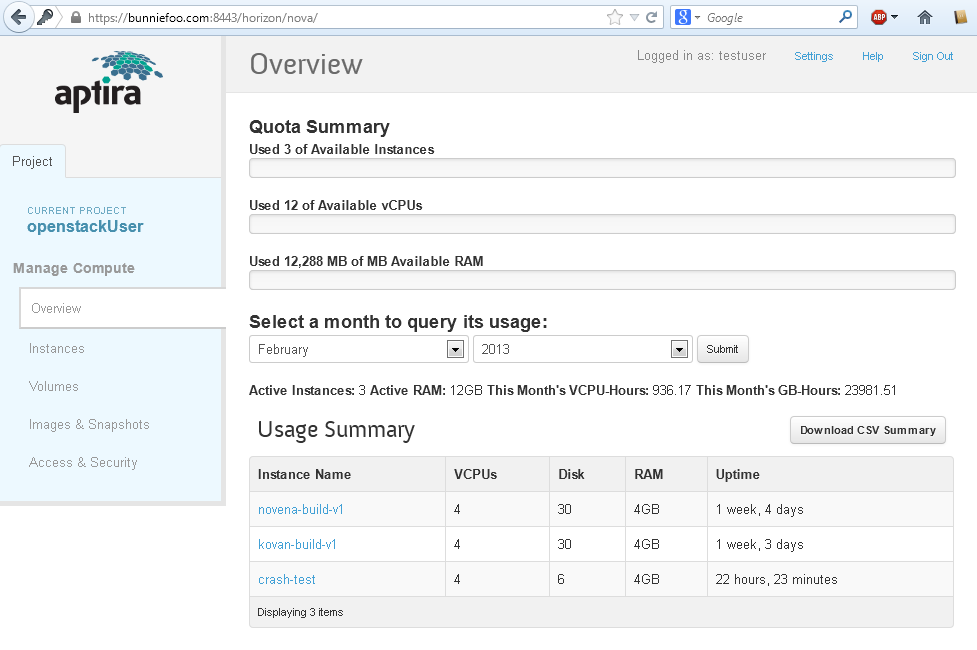
The first thing you will want to do is go to "access and security" and create a key pair for yourself.
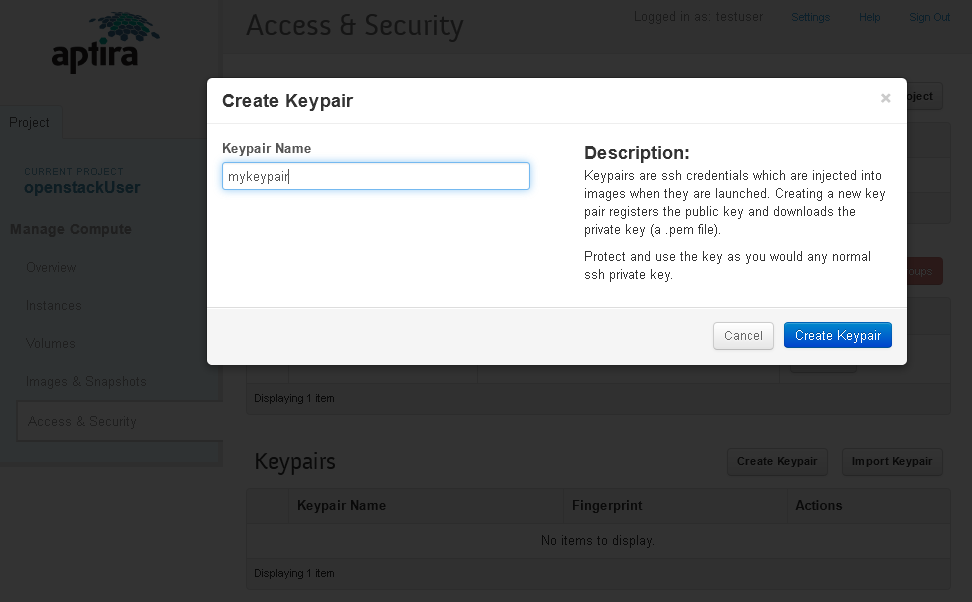
After making a keypair, you will be prompted to download a file ending in .pem. This is your private key. Keep it safe. If you lose it, you cannot re-download it; you will have to make a new keypair and you may lose access to your instance.

Next, click on "images & snapshots". This gives you a menu of pre-built images and snapshots you can use to make an instance. Generally, you will want to use a pre-built snapshot. This contains a pre-configured, pre-fetched, and pre-built OE tree, linux kernel, and u-boot. Using this will save you several hours of time. At the time of this writing, you would click on the "Launch" action for "novena build v1" under Instance Snapshots. Do not delete any snapshots, images, or volumes.
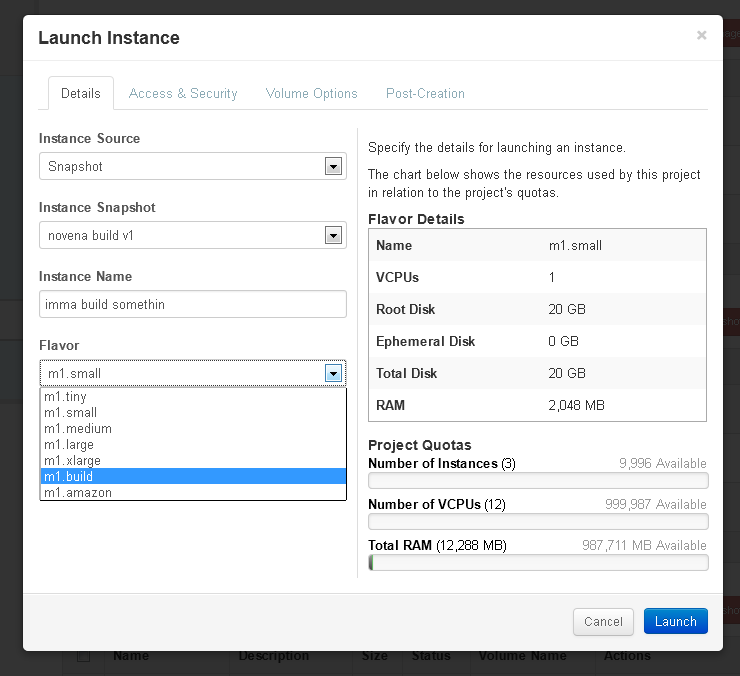
After you click the "Launch" button, you will be asked which instance type you would like to launch. We prefer you to use either m1.medium, or m1.build. If you get an error launching, the cloud may be over-subscribed, try a smaller instance type.
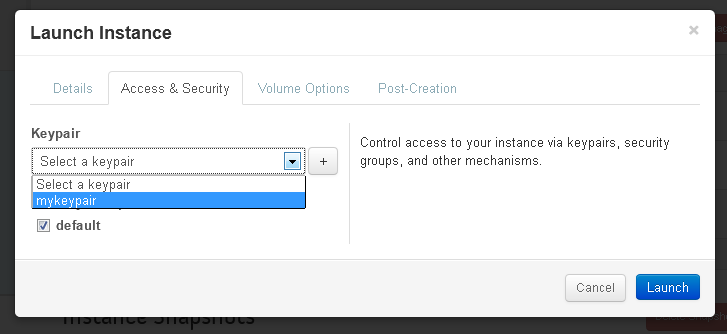
After picking the instance type, you must assign a keypair to the instance. Failure to do so will launch an instance that you can't log into. This is done by clicking the "access & security" tab and picking the keypair that you previously downloaded a private key for.
Give your instance a name, and hit launch and wait for the spawn to complete.
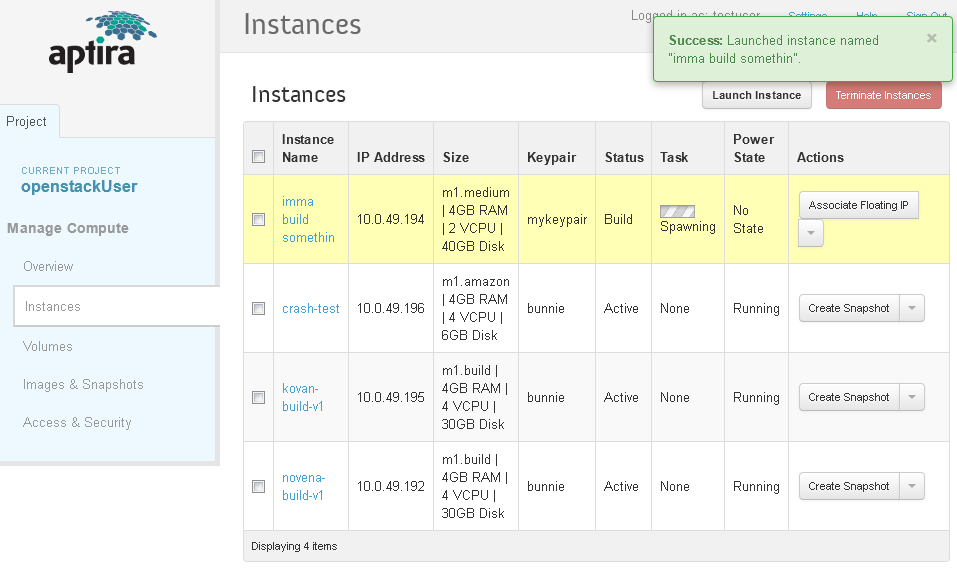
Once you are launched, you can log into your instance. Get the IP address from the IP address field.
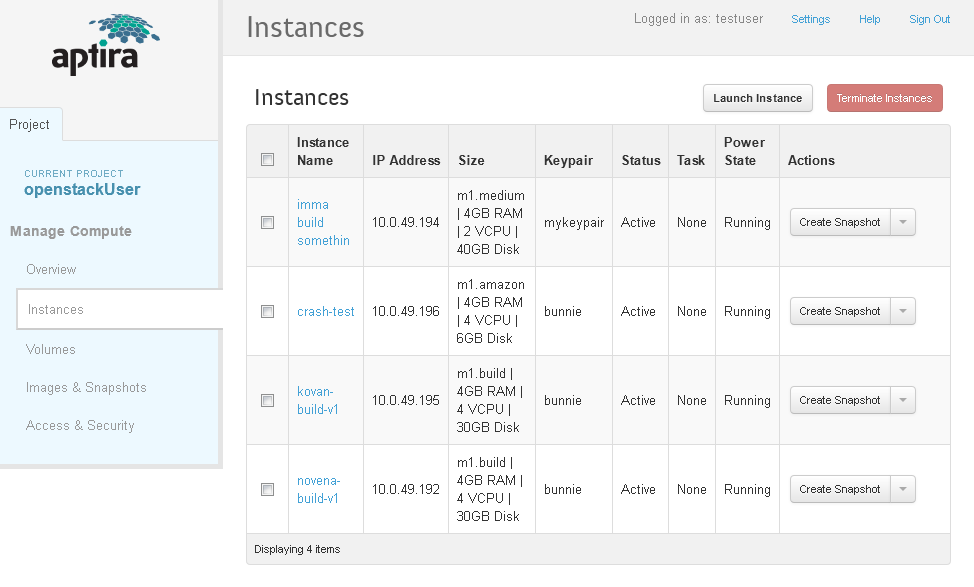
In this case, it's 10.0.49.194. Connect to the bunniefoo.com VPN (via PPTP (see [tutorials]; credentials will have been given to you already) and then issue the ssh command:
ssh -i mykey.pem ubuntu@10.0.49.194
The initial username is always ubuntu. You can add keys and users to your instance as you wish once you've logged in. Once you log in, you should see something like this:
$ ssh -i mykey.pem ubuntu@10.0.49.194
Welcome to Ubuntu 12.04.2 LTS (GNU/Linux 3.2.0-37-virtual x86_64)

 * Documentation:  https://help.ubuntu.com/

  System information as of Wed Feb 27 12:49:06 UTC 2013

  System load:  0.0                Processes:           66
  Usage of /:   35.9% of 39.37GB   Users logged in:     0
  Memory usage: 1%                 IP address for eth0: 10.0.49.194
  Swap usage:   0%

  Graph this data and manage this system at https://landscape.canonical.com/

  Get cloud support with Ubuntu Advantage Cloud Guest:
    http://www.ubuntu.com/business/services/cloud

  Use Juju to deploy your cloud instances and workloads:
    https://juju.ubuntu.com/#cloud-precise

0 packages can be updated.
0 updates are security updates.

Last login: Sun Feb 17 09:35:42 2013 from 10.0.49.9
ubuntu@imma-build-somethin:~$ ls
linux-next  oe  README.howtobuild  u-boot-imx6
ubuntu@imma-build-somethin:~$
Read the README.howtobuild file for further basic instructions on how to initiate builds.
Interop with EC2
When our private cloud hits capacity, or if you just want to gain control over your own private build image, you can migrate images out of our Aptira private cloud and into your very own EC2 instance.
To copy a private cloud root instance to EC2
To duplicate an instance on the kosagi private cloud into EC2:
- you must have admin privileges on hexapod.
- you must have an EC2 certificate with matching private key, and your ID and shared secret. These are accessed by going to your EC2 console, and clicking your username in the upper right hand corner, and selecting "Security Credentials". Everything except the private key can be downloaded. If you lack a private key for your certificate, you can create a new certificate on the spot and download a new private key. Note that if you already have two certificates, you can't create another one, so you have to permanently delete/revoke one of the certs to make a new one.
- You need to create an S3 bucket to hold the image as it is uploaded. Remember the availability zone and bucket name.
First create a snapshot on the local cloud: Go to "instances", and under "Actions" click "create snapshot".
Then, under images & snapshots, find the snapshot you made and click on the image name. There will be an ID code. Take note of the code.
On the private cloud server (hexapod), change the access permission on /mnt/openstack/glance/<image ID> to a+r. Otherwise, the next commands will fail with obscure error messages that don't really inform you of that problem.
On hexapod, send the volume into EC2:
ec2-import-volume -o <Access key ID> -w <Secret Access Key> --cert cert-XXXXXXXXXXXXXXXXXXXXXXXXXXX.pem --private-key pk-XXXXXXXXXXXXXXXXXXXXXXXXXXX.pem -f RAW -b <bucket-name> --region <region> --description "insert descriptive name here" -z <availability zone> /mnt/openstack/glance/<image ID>
If this command succeeds, don't forget to change the permission on the image to o-r. If it fails, use the --debug and -v flags. The most likely problems you'll have are with the credentials. If you're having troubles try using simpler ec2 commands like ec2-describe-availability-zones; this will require your X.509 certificate and you can at least test that out. I found that making your own cert doesn't always work (it sometimes does, and when it fails, the error messages are not helpful), you should really use the ones created by the amazon interface.
Now, log into your EC2 dashboard, and check in the availability zone that you've uploaded to, in the "Elastic Block Store->Volumes" section that a new volume has been created. If the volume is there, go to S3 and empty the bucket (otherwise you'll just end up paying for the storage of that bucket for no good reason).
Select the volume you've just uploaded, right-click, and "create snapshot"
Go to "Elastic Block Store->Snapshots"
Select the new snapshot, right-click, and "Create image from snapshot"
This will start a wizard that asks you for a kernel ID. The UI for this sucks. Basically, go to the canonical website and pull up the list of ubuntu kernel IDs for your region, and find the one that should be on the list. It's a long pull-down list. For ap-southeast-1a, I used aki-fe1354ac for a 12.04LTS image.
Once this is done, you'll have a new AMI. Go to "Images->AMIs". Right-click your new image, and select "Launch Instance". Configure the keypair, security group, etc.
Finally, you should be able to go to "Instances->Instances" and see your new instance running.
debugging
- credential issues: try running a "simple" command like ec2-describe-availability-zones to work out X.509 issues, this is the biggest headache. Worst case, make a new X.509 cert from the amazon UI; you can have up to two certs, if you have two already nuke one and you'll get a link to make a new one.
- if your imports fail, you *must* cancel them. Use ec2-describe-conversion-tasks (don't forget to specify --region, otherwise it just defaults to us-east) to list the tasks, and then use ec2-cancel-conversion-task to remove it from the queue. Otherwise, you'll get this error eventually: "Client.ResourceLimitExceeded: Task failed to initialize - conversion task limit (5) exceeded."
- --debug and -v are your friends
- check permissions on volumes you're trying to upload. The ec2 tools don't give helpful error reports when you can't read the file -- it makes it look like it was a network connection error, not a file access error.