Difference between revisions of "Orchard Firmware Developer's Guide"
(→Quickstart Firmware Flashing) |
(→Quickstart Connection) |
||
| Line 17: | Line 17: | ||
zcat orchard-pi-dev.img.gz | sudo dd of=/dev/mmcblkX bs=1M # for machines with directly accessible SD cards | zcat orchard-pi-dev.img.gz | sudo dd of=/dev/mmcblkX bs=1M # for machines with directly accessible SD cards | ||
Note that /dev/sdX is the device node of the SD card as mounted on your Linux system. If you don't know what we're talking about, be careful, because if you pick the wrong /dev/sdX node you'll end up destroying your local system boot disk. | Note that /dev/sdX is the device node of the SD card as mounted on your Linux system. If you don't know what we're talking about, be careful, because if you pick the wrong /dev/sdX node you'll end up destroying your local system boot disk. | ||
| + | |||
| + | This may take about 10 minutes. | ||
3. Insert card into RPi and boot. | 3. Insert card into RPi and boot. | ||
Revision as of 10:43, 27 May 2015
Orchard Firmware Developer's Guide
For the sake of convenience, Orchard firmware development, including compilation, flashing, and manufacturing provisioning is all done with a single tool: A Raspberry Pi.
Recommended tools:
- Raspberry Pi 2 Model B with 8 GB microSD card
- Firmware image: Raspberry pi Orchard development SD disk image
- A Linux machine to write the initial firmware image out
- Jumper cables, 5-wire (for SWD) and 2-wire (for UART)
Quickstart Connection
1. Download the RPi firmware image (~2.5GiB).
2. Image the downloaded firmware onto an SD card using the following Linux command:
zcat orchard-pi-dev.img.gz | sudo dd of=/dev/sdX bs=1M # for SD cards mounted via USB adapters
or
zcat orchard-pi-dev.img.gz | sudo dd of=/dev/mmcblkX bs=1M # for machines with directly accessible SD cards
Note that /dev/sdX is the device node of the SD card as mounted on your Linux system. If you don't know what we're talking about, be careful, because if you pick the wrong /dev/sdX node you'll end up destroying your local system boot disk.
This may take about 10 minutes.
3. Insert card into RPi and boot.
4. Figure out the IP address of the RPi and ssh into it. This is probably the hardest step.
- Here's a guide to figuring out your IP address
- One method is to access the local router configuration page and query the DHCP client list and look for the rasperrypi client. This works if you're in a home environment where you have access to the local DHCP server
- If you don't have access to that, you can plug in an HDMI monitor and keyboard and find the IP address using ifconfig
- A final method is to use nmap to scan for the IP address
- Another solution is to use zeroconf. The image provided runs zeroconf and if your local system supports that. Linux users should install avahi-dnsconfd. Windows users will need to install bonjour printing services. If you have zeroconf, you should be able to run
ssh pi@raspberrypi.local
And the system will automatically find it (assuming it's the only Pi on the network, additional Pi's get a hyphenated numeral after the raspberrypi name)
Either way, the credentials are "pi" and "raspberry" for the username and password.
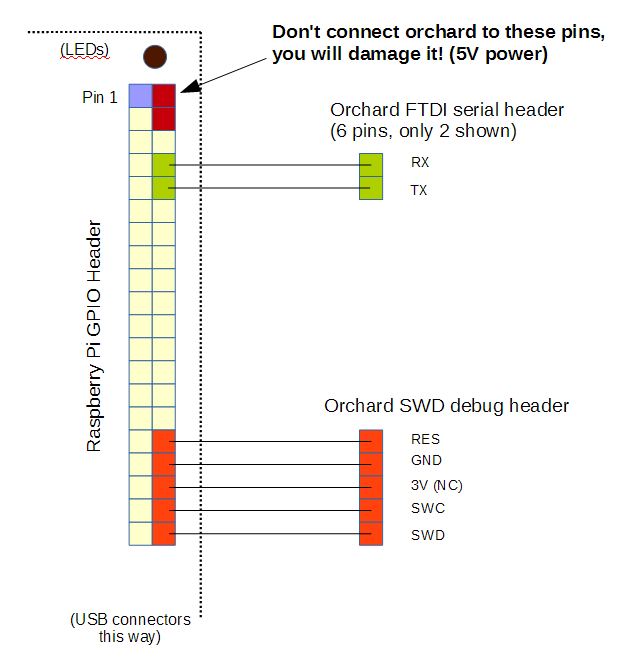
5. Wire up your raspberry pi to the orchard dev board.
Be careful to not use the two pins closest to the outside corner of the board. They have 5V on them and will damage orchard if you wire it up to its signal pins.

If you're unsure, here's some photos of the orchard-raspberry pi connection.
6. Plug power into the orchard dev board via the microUSB cable.
Quickstart Firmware Flashing
Build & flash your firmware image.
1. Update your source code
cd orchard-src
git pull
2. Build an image
cd ~/orchard-src/orchard
make -j4
3. Start openocd, the connection between the Rpi host and the Orchard target CPU:
sudo openocd -f sysfsgpio-rpi.cfg &
If you've wired up the boards correctly, you should see this somewhere in the log:
Info : SWD IDCODE 0x0bc11477
The correct IDCODE means we can see the CPU over the SWD debug port.
On a blank device, you will need to provision an initial firmware image. The Kinetis W repeatedly stabs itself in the eye when the Flash is empty, and will not work with GDB until it has something valid to run. The current procedure involves using a telnet protocol to run openOCD commands directly to provision an initial image:
telnet localhost 4444
Once in the telnet session, use these commands:
reset halt
program build/orchard.elf
reset
Once the initial image is provisioned, you can simply connect via gdb.
gdb build/orchard.elf
target remote localhost:3333
From this point, you can use all your usual gdb commands: breakpoints, running, source code listing, disassembly, variable inspection, single-stepping, etc. etc. For a list of common gdb commands, see Orchard gdb cheatsheet
To talk to the serial console, open another window (perhaps via a second ssh session) and type this command:
screen /dev/ttyAMA0 115200
You should see a "ch>" prompt if you hit enter.
To exit the screen session, type cntrl-A \ y