Difference between revisions of "NeTV Main Page"
(→Developing Hardware for NeTV) |
(→Firmware Development) |
||
| (One intermediate revision by the same user not shown) | |||
| Line 23: | Line 23: | ||
===Firmware Development=== | ===Firmware Development=== | ||
| + | |||
| + | The latest NeTV firmware is available [http://bunniefoo.com/netv/rom-chumby-silvermoon-netv-chumby-image-r43.zip for download]. | ||
| + | |||
There are three methods for developing Firmware on NeTV. | There are three methods for developing Firmware on NeTV. | ||
Latest revision as of 06:58, 26 November 2014
Welcome to the NeTV developer info page. NeTV is currently available as a development kit for use by developers, reviewers, and other people interested in evaluating the product. You can buy it at http://adafruit.com/products/609.
Beta Program: Beta users please see the NeTV beta program page for more info.
This page is intended for technical development use. If you are curious about the consumer facing features of NeTV, please see What is NeTV.
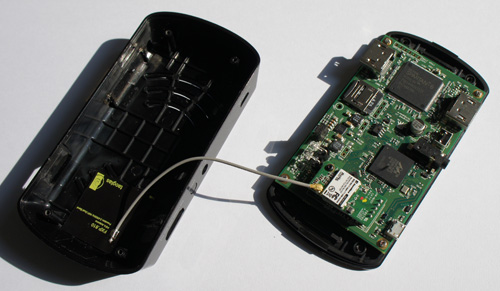
However, as far as developers and hackers are concerned, NeTV is a robust, wifi-enabled embedded linux computer that can connect to HD video sources and sinks. It has very strong potential applications in education, digital signage, smart energy, and low-cost computing.
Developing Software for NeTV
There are two categories of software development for NeTV.
One is firmware development. This includes the kernel, drivers, and application programs. If you are interested in writing C programs on embedded linux, then you should see the Firmware Development section.
The other is application development. This includes widgets, event generators, and android. If you are interested in creating user-facing applications written in javascript, HTML, and/or Dalvik (Android Java) then please see the Application Development section.
Configuring NeTV from the command line
Firmware Development
The latest NeTV firmware is available for download.
There are three methods for developing Firmware on NeTV.
- NeTV AMI Instance. This is intended for developers, OEMs, and professionals requiring a full SDK. Here, you will be walked through the setup and use of a pre-built development environment, complete with cross-compiler, located in the Amazon EC2 cloud. It uses buildbot and bitbake to create a robust development environment that is suitable for immediate production use. This path allows you to build complete ROM images from scratch, and to create packages that can be redistributed easily through on-line firmware updates.
- NeTV local compilation. This is intended for hobbyists and hackers who just need to build a couple programs to get the job done, and do not need a method to deploy their work to a large user base. Here, you can find out how to install gcc on the device and build a quick hello world program.
- NeTV toolchain. This is intended for hobbyists and hackers who would like to cross-compile more complex code, but who don't want to move to a complete OpenEmbedded environment. It's useful for kernel development, or simple C projects without many dependencies.
Application Development
Please choose a category for application development:
- NeTV local UI -- modifying the UI presented on the screen
- NeTV web services -- port 80 HTTP services that enable webapp, Android and iOS interaction
- "App" development -- quickstart guide to making your own crawler events
Tricks
Various hacks you can do to NeTV.
See NeTV tricks
USB Ethernet support
The NeTV is powered by a 5V supply shaped like a Micro-USB connector. Conveniently, the board draws around 300-700 mA of current when running. This is only slightly above USB spec, so you should be able to power it entirely from a USB port on your computer. Note that running the board in this manner can cause HDMI voltage to droop below 4.5V, making them out of spec. Also, some systems will shut off power to a USB port that draws more than 500 mA. This mode is provided as a convenience only.
When booted, the NeTV configures the Micro-USB port to act as an Ethernet gadget. It will configure itself with the IP address 10.0.88.1, and runs a DHCP server that will offer your desktop computer the address 10.0.88.4. You'll need to install a driver in order to get it working.
With the network configured, you will be able to connect to the NeTV board through SSH:
ssh root@10.0.88.1
This will work even if the wifi is unconfigured, or if you start fiddling with NetworkManager. This is because the network subsystem completely ignores the usb0 interface.
The NeTV makes extensive use of syslog. It logs both to a local buffer (which you can read by running "logread"), as well as to the USB network on UDP port 6368. To capture these messages, install netcat (which should come with OS X and most Linux distributions) and run:
nc -l -u 6368
To verify logging is working, ssh into your NeTV unit and log a message to syslog:
logger "Hello, world!"
Kernel hacking
- NeTV IR driver contains information on how to add IR code support to the driver.
Mobile app development
Android app is available in Android Market at http://market.android.com/details?id=com.chumby.NeTV
The source code is posted on github at http://github.com/sutajiokousagi/netv-android
iOS app is under heavy development and yet to be submitted to AppStore.
However, the latest source code (unstable, usable) is posted on github at http://github.com/sutajiokousagi/netv-ios
Both platforms uses a combination of HTTP & UDP API documented above.
USB extension board
Add more USB ports to your NeTV.
See NeTV USB extension board
Motor controller board
Add digital IO, analog inputs, motor/servo control power to your NeTV.
See NeTV Motor controller board
Developing Hardware for NeTV
CAD
Hardware source for NeTV's PCB, mechanical design, breakout board, and FPGA can be browsed at http://sutajiokousagi.com/netv_hardware/ (please note CC3.0-BY-SA license)
FPGA
Details on developing for the FPGA, modifying the design, and programming the existing design can be found at NeTV FPGA architecture. Git repo with latest code is here: https://github.com/bunnie/netv-fpga
