Difference between revisions of "Using Novena PVT1"
(Created page with "=Quickstart Guide= ==logging in== The default login password is root / kosagi ==getting a console== The image, by default intends for you to plug in an HDMI monitor, keyboard, ...") |
(→re-imaging firmware) |
||
| (3 intermediate revisions by 2 users not shown) | |||
| Line 19: | Line 19: | ||
The TTY settings are 115200 N-8-1. Again, with the current initial image, you'll just see u-boot spew and then it will appear to "hang" as all the remaining spew is sent to the HDMI console. | The TTY settings are 115200 N-8-1. Again, with the current initial image, you'll just see u-boot spew and then it will appear to "hang" as all the remaining spew is sent to the HDMI console. | ||
| + | |||
| + | ==upgrading== | ||
| + | The PVT1 units all come with debian/wheezy. We're entirely relying upon debian apt-get for package upgrades. Of course our kernel is custom, and we don't have a way to package and distribute that yet. Some common packages that you might want to install to configure the wireless network and browse the web are: | ||
| + | |||
| + | * wireless-tools | ||
| + | * wpasupplicant | ||
| + | * iceweasel | ||
| + | * ntpdate | ||
| + | |||
| + | ==installing u-boot== | ||
| + | u-boot can be built & installed following the procedure here: | ||
| + | |||
| + | http://www.kosagi.com/w/index.php?title=Building_novena_firmware#Getting_and_building_u-boot | ||
| + | |||
| + | ==fixing a brick== | ||
| + | The kernel and device tree are located on a FAT partition. If you happen to brick your device, you can take out the microSD card and mount it on a PC and update the kernel, uboot script, and device tree. | ||
| + | |||
| + | Also, there is a feature to boot a backup kernel by holding down the "user" button during power-on. The feature...mostly...works. | ||
| + | |||
| + | ==re-imaging firmware== | ||
| + | You can download the original image that was burned onto your board here: | ||
| + | |||
| + | http://bunniefoo.com/bunnie/novena-qb-image.bin.gz | ||
| + | http://bunniefoo.com/bunnie/novena-qb-image.bin.gz.md5sum | ||
| + | |||
| + | The gzip file is ~370MiB in size. | ||
| + | |||
| + | You can zcat this onto the root device node of your card, e.g. this image contains the MBR and both partitions in a single ball. You can use a different card than the original, the only restriction is that the capacity has to be 4GiB or greater. Note that if you use a larger card, / will still show up as 4GiB only, until you use ext tools to resize the partition (not tested but fairly confident this will work). | ||
Latest revision as of 06:01, 14 April 2014
Contents
Quickstart Guide
logging in
The default login password is root / kosagi
getting a console
The image, by default intends for you to plug in an HDMI monitor, keyboard, and mouse, and use the device a bit like a (rudimentary) desktop environment. By default, console spew goes to HDMI and not to a TTY.
using a TTY
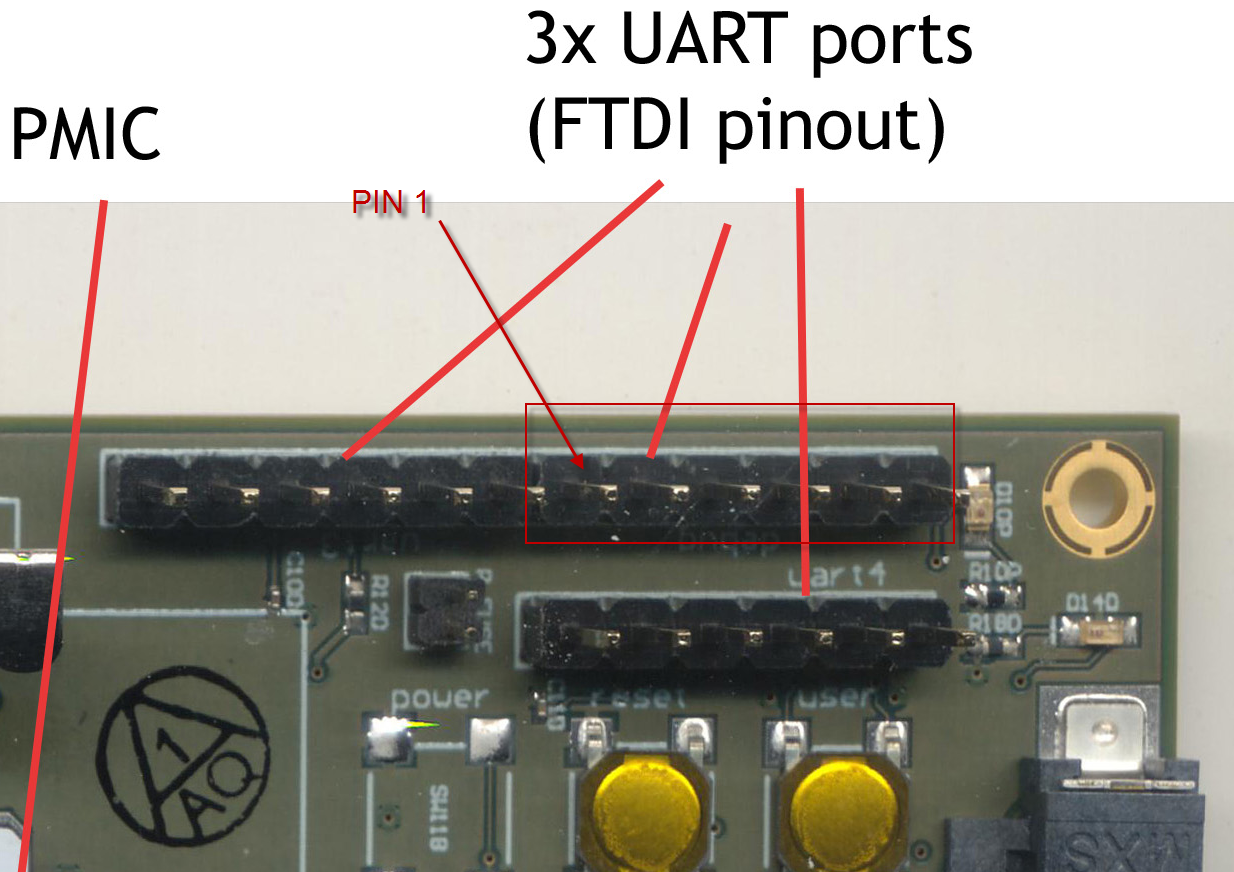
If you want to use a TTY, you should use the serial port labeled "debug". It's the at the very top left, underneath the LED labeled "pwr". There are actually three debug UARTs located in the cluster there.

You can use a standard FTDI debug cable, such as this one from Sparkfun:
https://www.sparkfun.com/products/9717
Pin 1 (ground) is away from the LED.
The TTY settings are 115200 N-8-1. Again, with the current initial image, you'll just see u-boot spew and then it will appear to "hang" as all the remaining spew is sent to the HDMI console.
upgrading
The PVT1 units all come with debian/wheezy. We're entirely relying upon debian apt-get for package upgrades. Of course our kernel is custom, and we don't have a way to package and distribute that yet. Some common packages that you might want to install to configure the wireless network and browse the web are:
- wireless-tools
- wpasupplicant
- iceweasel
- ntpdate
installing u-boot
u-boot can be built & installed following the procedure here:
http://www.kosagi.com/w/index.php?title=Building_novena_firmware#Getting_and_building_u-boot
fixing a brick
The kernel and device tree are located on a FAT partition. If you happen to brick your device, you can take out the microSD card and mount it on a PC and update the kernel, uboot script, and device tree.
Also, there is a feature to boot a backup kernel by holding down the "user" button during power-on. The feature...mostly...works.
re-imaging firmware
You can download the original image that was burned onto your board here:
http://bunniefoo.com/bunnie/novena-qb-image.bin.gz
http://bunniefoo.com/bunnie/novena-qb-image.bin.gz.md5sum
The gzip file is ~370MiB in size.
You can zcat this onto the root device node of your card, e.g. this image contains the MBR and both partitions in a single ball. You can use a different card than the original, the only restriction is that the capacity has to be 4GiB or greater. Note that if you use a larger card, / will still show up as 4GiB only, until you use ext tools to resize the partition (not tested but fairly confident this will work).